【2.1.8】热电图(matplotlib-heatmap)
啥也不说了,根据图来选择代码吧。。
Correlogram用于直观地查看给定数据帧(或2D数组)中所有可能的数值变量对之间的相关度量。
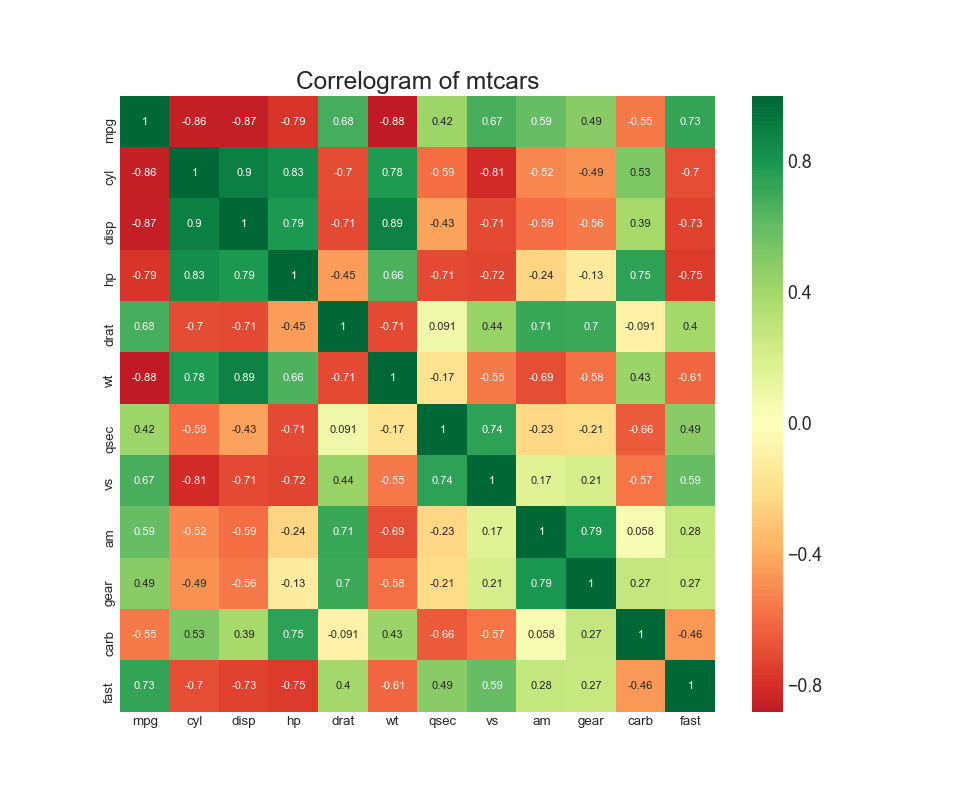
# Import Dataset
df = pd.read_csv("https://github.com/selva86/datasets/raw/master/mtcars.csv")

# Plot
plt.figure(figsize=(12,10), dpi= 80)
sns.heatmap(df.corr(), xticklabels=df.corr().columns, yticklabels=df.corr().columns, cmap='RdYlGn', center=0, annot=True)

# Decorations
plt.title('Correlogram of mtcars', fontsize=22)
plt.xticks(fontsize=12)
plt.yticks(fontsize=12)
plt.show()
例一
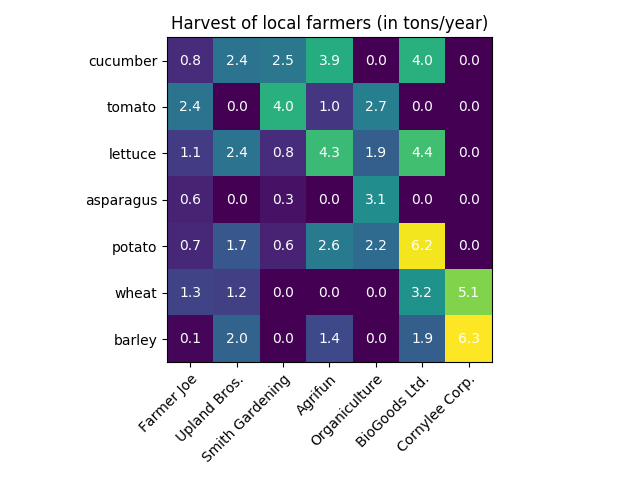
import numpy as np
import matplotlib
import matplotlib.pyplot as plt
# sphinx_gallery_thumbnail_number = 2

vegetables = ["cucumber", "tomato", "lettuce", "asparagus",
              "potato", "wheat", "barley"]
farmers = ["Farmer Joe", "Upland Bros.", "Smith Gardening",
           "Agrifun", "Organiculture", "BioGoods Ltd.", "Cornylee Corp."]

harvest = np.array([[0.8, 2.4, 2.5, 3.9, 0.0, 4.0, 0.0],
                    [2.4, 0.0, 4.0, 1.0, 2.7, 0.0, 0.0],
                    [1.1, 2.4, 0.8, 4.3, 1.9, 4.4, 0.0],
                    [0.6, 0.0, 0.3, 0.0, 3.1, 0.0, 0.0],
                    [0.7, 1.7, 0.6, 2.6, 2.2, 6.2, 0.0],
                    [1.3, 1.2, 0.0, 0.0, 0.0, 3.2, 5.1],
                    [0.1, 2.0, 0.0, 1.4, 0.0, 1.9, 6.3]])


fig, ax = plt.subplots()
im = ax.imshow(harvest)

# We want to show all ticks...
ax.set_xticks(np.arange(len(farmers)))
ax.set_yticks(np.arange(len(vegetables)))
# ... and label them with the respective list entries
ax.set_xticklabels(farmers)
ax.set_yticklabels(vegetables)

# Rotate the tick labels and set their alignment.
plt.setp(ax.get_xticklabels(), rotation=45, ha="right",
         rotation_mode="anchor")

# Loop over data dimensions and create text annotations.
for i in range(len(vegetables)):
    for j in range(len(farmers)):
        text = ax.text(j, i, harvest[i, j],
                       ha="center", va="center", color="w")

ax.set_title("Harvest of local farmers (in tons/year)")
fig.tight_layout()
plt.show()
例2:
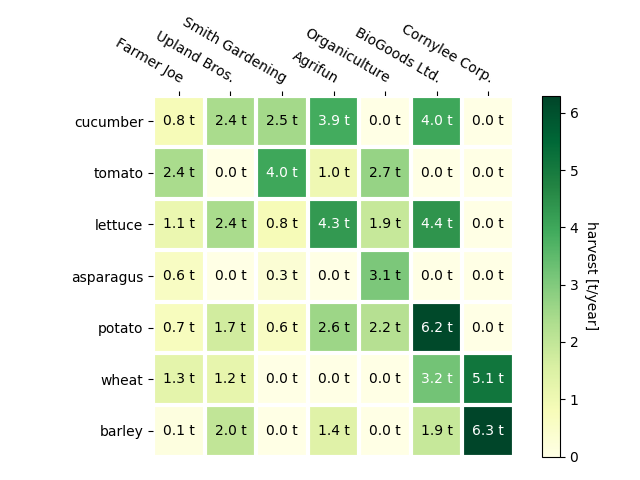
## 自定义颜色、位置、文字内容等
def heatmap(data, row_labels, col_labels, ax=None,
            cbar_kw={}, cbarlabel="", **kwargs):
    """
    Create a heatmap from a numpy array and two lists of labels.

    Arguments:
        data       : A 2D numpy array of shape (N,M)
        row_labels : A list or array of length N with the labels
                     for the rows
        col_labels : A list or array of length M with the labels
                     for the columns
    Optional arguments:
        ax         : A matplotlib.axes.Axes instance to which the heatmap
                     is plotted. If not provided, use current axes or
                     create a new one.
        cbar_kw    : A dictionary with arguments to
                     :meth:`matplotlib.Figure.colorbar`.
        cbarlabel  : The label for the colorbar
    All other arguments are directly passed on to the imshow call.
    """

    if not ax:
        ax = plt.gca()

    # Plot the heatmap
    im = ax.imshow(data, **kwargs)

    # Create colorbar
    cbar = ax.figure.colorbar(im, ax=ax, **cbar_kw)
    cbar.ax.set_ylabel(cbarlabel, rotation=-90, va="bottom")

    # We want to show all ticks...
    ax.set_xticks(np.arange(data.shape[1]))
    ax.set_yticks(np.arange(data.shape[0]))
    # ... and label them with the respective list entries.
    ax.set_xticklabels(col_labels)
    ax.set_yticklabels(row_labels)

    # Let the horizontal axes labeling appear on top.
    ax.tick_params(top=True, bottom=False,
                   labeltop=True, labelbottom=False)

    # Rotate the tick labels and set their alignment.
    plt.setp(ax.get_xticklabels(), rotation=-30, ha="right",
             rotation_mode="anchor")

    # Turn spines off and create white grid.
    for edge, spine in ax.spines.items():
        spine.set_visible(False)

    ax.set_xticks(np.arange(data.shape[1]+1)-.5, minor=True)
    ax.set_yticks(np.arange(data.shape[0]+1)-.5, minor=True)
    ax.grid(which="minor", color="w", linestyle='-', linewidth=3)
    ax.tick_params(which="minor", bottom=False, left=False)

    return im, cbar


def annotate_heatmap(im, data=None, valfmt="{x:.2f}",
                     textcolors=["black", "white"],
                     threshold=None, **textkw):
    """
    A function to annotate a heatmap.

    Arguments:
        im         : The AxesImage to be labeled.
    Optional arguments:
        data       : Data used to annotate. If None, the image's data is used.
        valfmt     : The format of the annotations inside the heatmap.
                     This should either use the string format method, e.g.
                     "$ {x:.2f}", or be a :class:`matplotlib.ticker.Formatter`.
        textcolors : A list or array of two color specifications. The first is
                     used for values below a threshold, the second for those
                     above.
        threshold  : Value in data units according to which the colors from
                     textcolors are applied. If None (the default) uses the
                     middle of the colormap as separation.

    Further arguments are passed on to the created text labels.
    """

    if not isinstance(data, (list, np.ndarray)):
        data = im.get_array()

    # Normalize the threshold to the images color range.
    if threshold is not None:
        threshold = im.norm(threshold)
    else:
        threshold = im.norm(data.max())/2.

    # Set default alignment to center, but allow it to be
    # overwritten by textkw.
    kw = dict(horizontalalignment="center",
              verticalalignment="center")
    kw.update(textkw)

    # Get the formatter in case a string is supplied
    if isinstance(valfmt, str):
        valfmt = matplotlib.ticker.StrMethodFormatter(valfmt)

    # Loop over the data and create a `Text` for each "pixel".
    # Change the text's color depending on the data.
    texts = []
    for i in range(data.shape[0]):
        for j in range(data.shape[1]):
            kw.update(color=textcolors[im.norm(data[i, j]) > threshold])
            text = im.axes.text(j, i, valfmt(data[i, j], None), **kw)  # 这一步进行判断,可以隐藏你不想表示的值,比如说值为0的就不显示
            texts.append(text)

    return texts

# 作图
fig, ax = plt.subplots()

im, cbar = heatmap(harvest, vegetables, farmers, ax=ax,
                   cmap="YlGn", cbarlabel="harvest [t/year]")
texts = annotate_heatmap(im, valfmt="{x:.1f} t")

fig.tight_layout()
plt.show()
例三
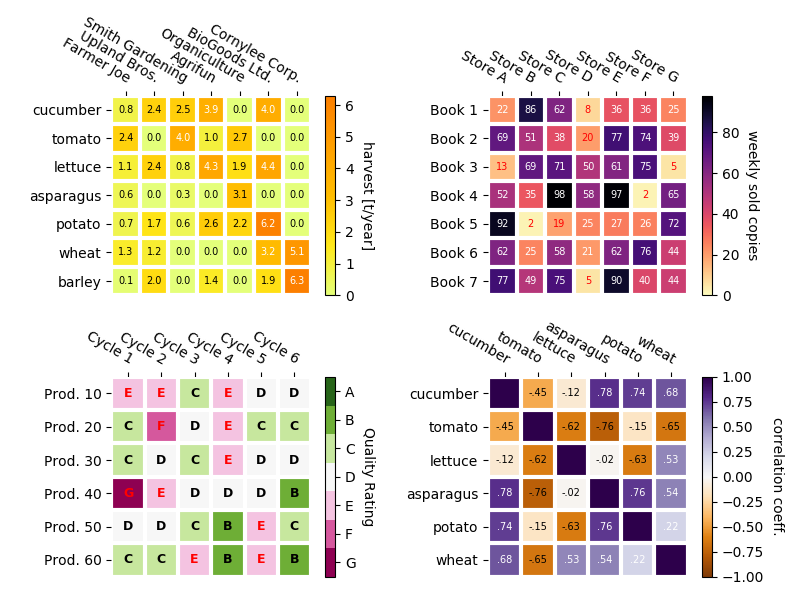
代码:
np.random.seed(19680801)

fig, ((ax, ax2), (ax3, ax4)) = plt.subplots(2, 2, figsize=(8, 6))

# 用不同的颜色和不同的字体大小 来代替上图

im, _ = heatmap(harvest, vegetables, farmers, ax=ax,
                cmap="Wistia", cbarlabel="harvest [t/year]")
annotate_heatmap(im, valfmt="{x:.1f}", size=7)

# vmin用来归一化数据(??);
# 小于20的红色字体,大于20的白色字体
# 重新定义xlabel和ylabel

data = np.random.randint(2, 100, size=(7, 7))
y = ["Book {}".format(i) for i in range(1, 8)]
x = ["Store {}".format(i) for i in list("ABCDEFG")]
im, _ = heatmap(data, y, x, ax=ax2, vmin=0,
                cmap="magma_r", cbarlabel="weekly sold copies")
annotate_heatmap(im, valfmt="{x:d}", size=7, threshold=20,
                 textcolors=["red", "white"])


# matplotlib.colors.BoundaryNorm来处理分类值

data = np.random.randn(6, 6)
y = ["Prod. {}".format(i) for i in range(10, 70, 10)]
x = ["Cycle {}".format(i) for i in range(1, 7)]

qrates = np.array(list("ABCDEFG"))
norm = matplotlib.colors.BoundaryNorm(np.linspace(-3.5, 3.5, 8), 7)
fmt = matplotlib.ticker.FuncFormatter(lambda x, pos: qrates[::-1][norm(x)])

im, _ = heatmap(data, y, x, ax=ax3,
                cmap=plt.get_cmap("PiYG", 7), norm=norm,
                cbar_kw=dict(ticks=np.arange(-3, 4), format=fmt),
                cbarlabel="Quality Rating")

annotate_heatmap(im, valfmt=fmt, size=9, fontweight="bold", threshold=-1,
                 textcolors=["red", "black"])


# 通过vmin和vmax来限定最大值和最小值(估计是指的颜色区段)
# 让某些数值或数值中的某些字符不显示

corr_matrix = np.corrcoef(np.random.rand(6, 5))
im, _ = heatmap(corr_matrix, vegetables, vegetables, ax=ax4,
                cmap="PuOr", vmin=-1, vmax=1,
                cbarlabel="correlation coeff.")


def func(x, pos):
    return "{:.2f}".format(x).replace("0.", ".").replace("1.00", "")

annotate_heatmap(im, valfmt=matplotlib.ticker.FuncFormatter(func), size=7)


plt.tight_layout()
plt.show()
我的案例
案例1
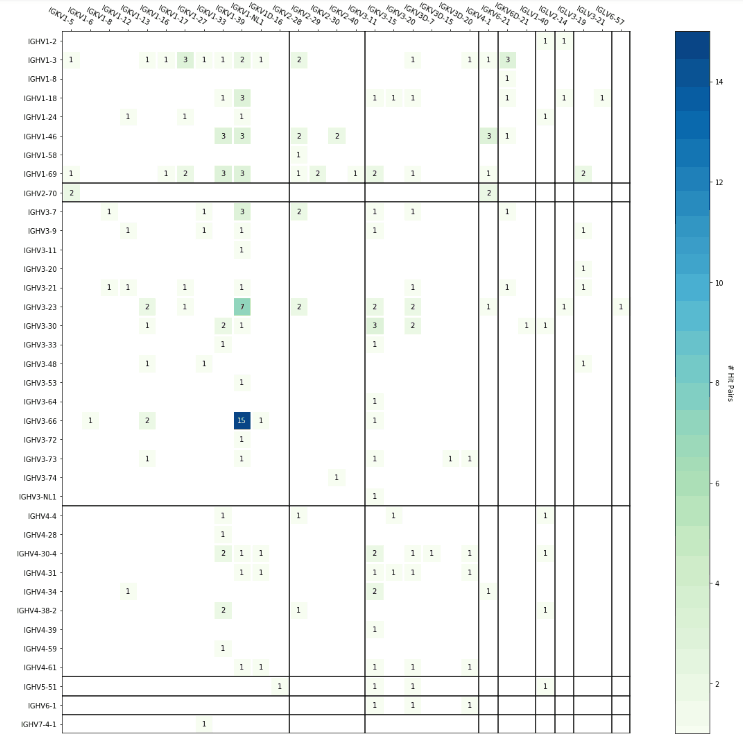
代码:
import datetime
import matplotlib

# matplotlib.use('Agg')
import matplotlib.pyplot as plt
from matplotlib.dates import date2num
from collections import Counter
import matplotlib.patches as mpatches
import numpy as np
import pandas as pd

def heatmap(data, row_labels, col_labels, ax=None,
            cbar_kw={}, cbarlabel="", **kwargs):
    """
    Create a heatmap from a numpy array and two lists of labels.

    Arguments:
        data       : A 2D numpy array of shape (N,M)
        row_labels : A list or array of length N with the labels
                     for the rows
        col_labels : A list or array of length M with the labels
                     for the columns
    Optional arguments:
        ax         : A matplotlib.axes.Axes instance to which the heatmap
                     is plotted. If not provided, use current axes or
                     create a new one.
        cbar_kw    : A dictionary with arguments to
                     :meth:`matplotlib.Figure.colorbar`.
        cbarlabel  : The label for the colorbar
    All other arguments are directly passed on to the imshow call.
    """

    if not ax:
        ax = plt.gca()

    # Plot the heatmap
    im = ax.imshow(data, **kwargs)

#     print im

    # Create colorbar
    cbar = ax.figure.colorbar(im, ax=ax, **cbar_kw)
    cbar.ax.set_ylabel(cbarlabel, rotation=-90, va="bottom")

    # We want to show all ticks...
    ax.set_xticks(np.arange(data.shape[1]))
    ax.set_yticks(np.arange(data.shape[0]))
    # ... and label them with the respective list entries.
    ax.set_xticklabels(col_labels)
    ax.set_yticklabels(row_labels)

    # Let the horizontal axes labeling appear on top.
    ax.tick_params(top=True, bottom=False,
                   labeltop=True, labelbottom=False)

    # Rotate the tick labels and set their alignment.
    plt.setp(ax.get_xticklabels(), rotation=-30, ha="right",
             rotation_mode="anchor")

    # Turn spines off and create white grid.
    for edge, spine in ax.spines.items():
        spine.set_visible(False)

    ax.set_xticks(np.arange(data.shape[1]+1)-.5, minor=True)
    ax.set_yticks(np.arange(data.shape[0]+1)-.5, minor=True)

    ax.grid(which="minor", color="w", linestyle='-', linewidth=3)
    ax.tick_params(which="minor", bottom=False, left=False)

    return im, cbar


def annotate_heatmap(im, data=None, valfmt="{x:.2f}",
                     textcolors=["black", "white"],
                     threshold=None, **textkw):
    """
    A function to annotate a heatmap.

    Arguments:
        im         : The AxesImage to be labeled.
    Optional arguments:
        data       : Data used to annotate. If None, the image's data is used.
        valfmt     : The format of the annotations inside the heatmap.
                     This should either use the string format method, e.g.
                     "$ {x:.2f}", or be a :class:`matplotlib.ticker.Formatter`.
        textcolors : A list or array of two color specifications. The first is
                     used for values below a threshold, the second for those
                     above.
        threshold  : Value in data units according to which the colors from
                     textcolors are applied. If None (the default) uses the
                     middle of the colormap as separation.

    Further arguments are passed on to the created text labels.
    """

    if not isinstance(data, (list, np.ndarray)):
        data = im.get_array()

    # Normalize the threshold to the images color range.
    if threshold is not None:
        threshold = im.norm(threshold)
    else:
        threshold = im.norm(data.max())/2.

    # Set default alignment to center, but allow it to be
    # overwritten by textkw.
    kw = dict(horizontalalignment="center",

铁汉  17:01:39
             verticalalignment="center")
    kw.update(textkw)

    # Get the formatter in case a string is supplied
    if isinstance(valfmt, str):
        valfmt = matplotlib.ticker.StrMethodFormatter(valfmt)

    # Loop over the data and create a `Text` for each "pixel".
    # Change the text's color depending on the data.
    texts = []
    for i in range(data.shape[0]):
        for j in range(data.shape[1]):
            kw.update(color=textcolors[im.norm(data[i, j]) > threshold])
            if data[i, j] >0 :
                text = im.axes.text(j, i, valfmt(data[i, j], None), **kw)
                texts.append(text)

    return texts

data_info  = pd.read_csv('result/adimab-ident-matrix-2.tsv',sep='\t',index_col=0,header=0)
# print data_info

# data_info['col_sum'] = data_info.apply(lambda x:x.sum(),axis=1)
# data_info.loc['row_sum'] = data_info.apply(lambda x:x.sum(),axis=0)

# print data_info
column_names_1  = list(data_info.columns.values)
row_names_1 = list(data_info.index)

sorted_column = column_names_1
sorted_row = row_names_1

# data_info = data_info.loc[sorted_row]
# data_info = data_info.loc[:,sorted_column]

harvest = np.array(data_info)

fig, ax = plt.subplots()

harvest = np.ma.masked_where(harvest < 1, harvest)

cmap = plt.cm.OrRd
cmap.set_bad(color='white')

im, cbar = heatmap(harvest,  sorted_row,sorted_column, ax=ax,
                   cmap="GnBu", cbarlabel="# Hit Pairs")
texts = annotate_heatmap(im, valfmt="{x}")

thin = plt.rcParams['lines.linewidth']
ax.axhline(-0.5, color='black', lw=thin)
ax.axhline(7.5, color='black', lw=thin)
ax.axhline(8.5, color='black', lw=thin)
ax.axhline(24.5, color='black', lw=thin)
ax.axhline(33.5, color='black', lw=thin)
ax.axhline(34.5, color='black', lw=thin)
ax.axhline(35.5, color='black', lw=thin)
ax.axhline(36.49, color='black', lw=thin)


ax.axvline(-0.5, color='black', lw=thin)
ax.axvline(11.5, color='black', lw=thin)
ax.axvline(15.5, color='black', lw=thin)
ax.axvline(21.5, color='black', lw=thin)
ax.axvline(22.5, color='black', lw=thin)
ax.axvline(24.5, color='black', lw=thin)
ax.axvline(25.5, color='black', lw=thin)
ax.axvline(26.5, color='black', lw=thin)
ax.axvline(28.5, color='black', lw=thin)
ax.axvline(29.45, color='black', lw=thin)


fig = matplotlib.pyplot.gcf()
fig.set_size_inches(18, 15)
plt.savefig('pic/pair-match-3.jpeg',dpi=400)
fig.tight_layout()
plt.show()
参考资料
这里是一个广告位,,感兴趣的都可以发邮件聊聊:tiehan@sina.cn
![]() 个人公众号,比较懒,很少更新,可以在上面提问题,如果回复不及时,可发邮件给我: tiehan@sina.cn
个人公众号,比较懒,很少更新,可以在上面提问题,如果回复不及时,可发邮件给我: tiehan@sina.cn

